In one project, I needed to provide an internet exit point in another country for a specific device. A challenge was that this device does not support VPN clients and offers no control over routing or network settings. At the same time, all outgoing traffic had to reliably pass through a predefined exit point.
I already had an existing Tailscale setup: a private control plane based on the open source Headscale and several Exit Nodes deployed in different countries. The goal was not to build a new VPN network, but to integrate the solution cleanly into the existing infrastructure.
The solution was to place an intermediate network gateway between the device and the internet. For the client device, this gateway looks like a regular router. All VPN logic and routing live outside the client. As a result, the device is completely unaware of the VPN, but all its traffic exits through the required country.
This kind of gateway can be built on any Debian-based system. In this case, Raspberry Pi 4 was used because it was readily available: compact, power-efficient, and fast enough for a VPN gateway. A second network interface is added using a USB-to-Ethernet adapter.
Solution Architecture
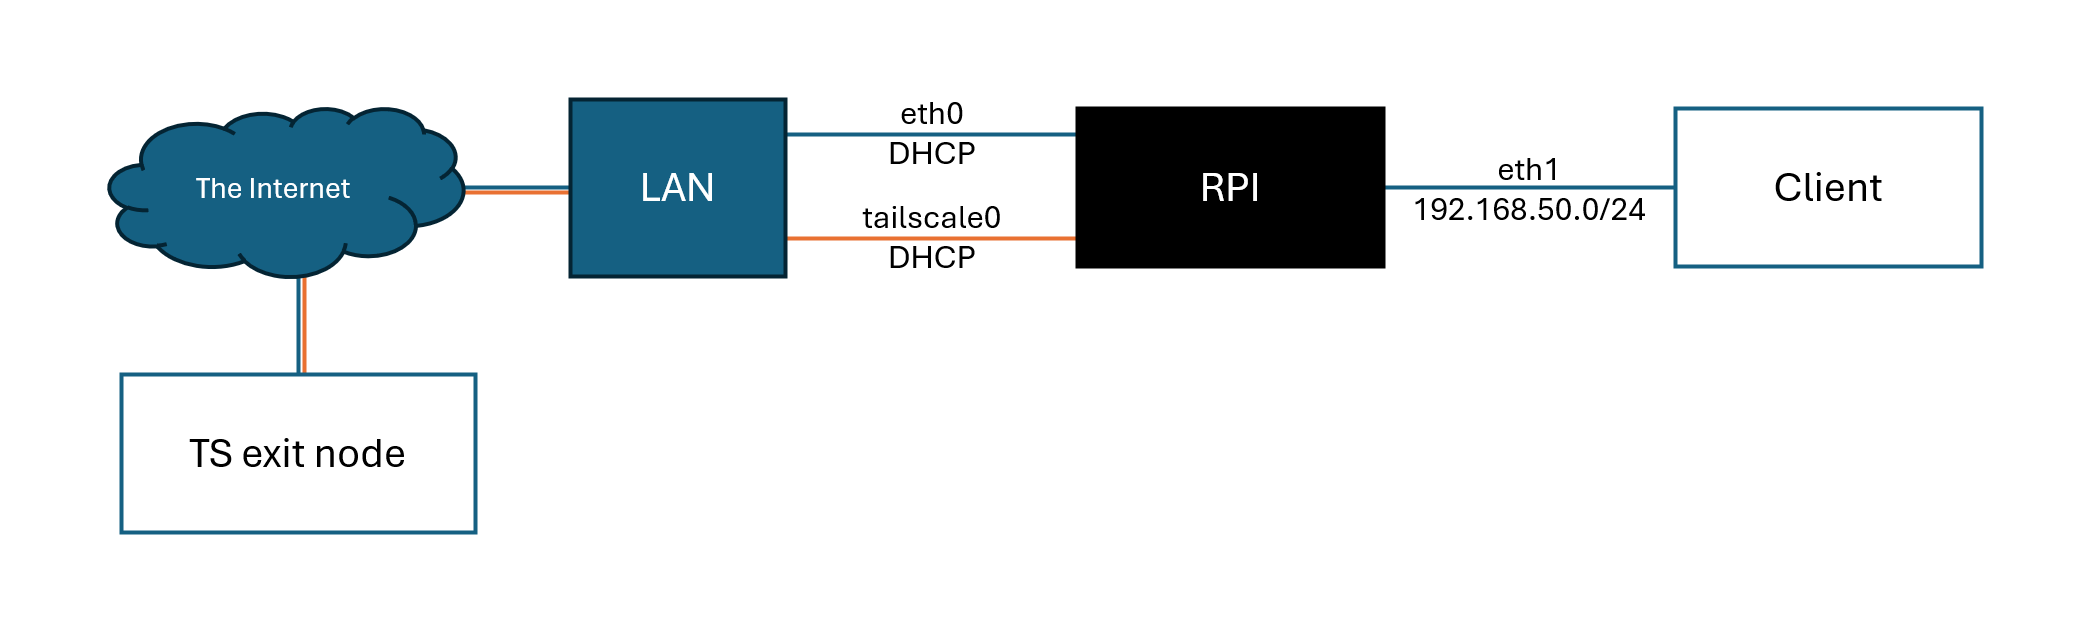
The Raspberry Pi has two network interfaces:
- The built-in interface
eth0is connected to the home network and gets its IP via DHCP. It is used for Tailscale connectivity and SSH management. - The second interface, a USB Ethernet adapter
eth1, is dedicated exclusively to the client device. It operates in a separate subnet and is fully isolated from the main network.
All traffic coming from the client on eth1 is routed through the tailscale0 interface and then sent to the selected Exit Node. Direct access from the client to eth0 is blocked at the firewall level, which prevents VPN bypass even if routing is misconfigured.
Basic System Preparation
A clean server installation of Ubuntu Server or Raspberry Pi OS without a GUI is used. SSH access is assumed.
First, update the system:
sudo apt update && sudo apt upgrade -yInstalling and Configuring Tailscale
Tailscale is installed using the official script:
curl -fsSL https://tailscale.com/install.sh | shThe device is then connected to the tailnet with a specific Exit Node. Since a private control plane is used, the --login-server parameter is required.
sudo tailscale up \
  --login-server=https://<control-plane-url> \
  --accept-dns=false \
  --exit-node=<exit-node-fqdn-or-ip> \
  --exit-node-allow-lan-access
Key configuration points:
--accept-dns=falsedisables automatic DNS configuration from Tailscale. DNS is handled locally to avoid leaks and client issues.--exit-nodedefines the exact exit point.--exit-node-allow-lan-accessallows the Raspberry Pi to access its local network. Without this flag, all traffic-including local traffic-would go through the tunnel.
To verify routing:
ip route get 1.1.1.1The output should show tailscale0 as the interface.
user@gate:~ $ ip route get 1.1.1.1
1.1.1.1 dev tailscale0 table 52 src 100.100.0.39 uid 1000
    cache
Enabling IP Forwarding
Since the Raspberry Pi acts as a router, packet forwarding must be enabled:
sudo sysctl -w net.ipv4.ip_forward=1
sudo sysctl -w net.ipv6.conf.all.forwarding=1
Without this, the client will get an IP address but traffic will not pass through the gateway.
Client Interface Configuration with Netplan
Modern Ubuntu Server and Raspberry Pi OS use netplan with NetworkManager.
The client interface is configured with a static IP in a separate subnet:
sudo tee /etc/netplan/91-eth1.yaml >/dev/null <<'EOF'
network:
  version: 2
  renderer: NetworkManager
  ethernets:
    eth1:
      dhcp4: false
      dhcp6: false
      addresses:
        - 192.168.50.1/24
EOF
A static IP from 192.168.50.0/24 is required because this address is used as both the gateway and DNS server for the client. Using a dedicated subnet simplifies firewall rules and avoids conflicts with the main network.
Fix file permissions to avoid netplan warnings:
sudo chmod 600 /etc/netplan/*.yaml
sudo netplan apply
After applying the configuration, eth1 should have the address 192.168.50.1.
3: eth1: <BROADCAST,MULTICAST,UP,LOWER_UP> mtu 1500 qdisc fq_codel state UP group default qlen 1000
    link/ether 9c:69:d3:24:2e:e5 brd ff:ff:ff:ff:ff:ff
    inet 192.168.50.1/24 brd 192.168.50.255 scope global noprefixroute eth1
       valid_lft forever preferred_lft forever
DHCP and DNS for the Client (dnsmasq)
dnsmasq is used for DHCP and DNS. It is lightweight, stable, and well suited for this setup.
sudo apt install dnsmasq -yConfiguration for the eth1 interface:
Important notes:
bind-dynamicallowsdnsmasqto work correctly with USB Ethernet adapters that may appear after boot.- The Raspberry Pi itself acts as the DNS server. This proved to be the most reliable option, as it resolves all DNS queries through Tailscale.
Restart the service and verify that DHCP and DNS are listening:
sudo systemctl restart dnsmasq
sudo ss -lunp | grep dnsmasq
user@gate:~ $ sudo ss -lunp | grep dnsmasq
UNCONN 0      0                        127.0.0.1:53         0.0.0.0:*    users:(("dnsmasq",pid=2304,fd=8))
UNCONN 0      0                     192.168.50.1:53         0.0.0.0:*    users:(("dnsmasq",pid=2304,fd=6))
UNCONN 0      0                          0.0.0.0:67         0.0.0.0:*    users:(("dnsmasq",pid=2304,fd=4))
UNCONN 0      0                            [::1]:53               *:*    users:(("dnsmasq",pid=2304,fd=10))
Routing and NAT Toward Tailscale
To send client traffic through the Exit Node, NAT is configured toward tailscale0:
sudo iptables -t nat -A POSTROUTING \
  -s 192.168.50.0/24 -o tailscale0 -j MASQUERADE
Using MASQUERADE avoids advertising the client subnet to the tailnet and keeps the setup independent of external IP addresses.
Forwarding between interfaces is also allowed:
sudo iptables -A FORWARD -i eth1 -o tailscale0 -j ACCEPT
sudo iptables -A FORWARD -i tailscale0 -o eth1 -m state --state RELATED,ESTABLISHED -j ACCEPT
Preventing VPN Bypass
A critical step is blocking client access to the main interface eth0. This guarantees that if Tailscale goes down, traffic will not leak directly to the internet.
sudo iptables -A FORWARD -i eth1 -o eth0 -j DROP
sudo iptables -A FORWARD -i eth0 -o eth1 -j DROP
This creates a fail-closed setup: if the VPN is unavailable, the client simply loses internet access.
Persisting Firewall Rules
To ensure firewall rules survive reboots:
sudo apt install iptables-persistent -y
sudo netfilter-persistent save
Verifying the Setup
After connecting the client device to the USB Ethernet adapter, it should receive:
- IP address from
192.168.50.0/24 - Gateway:
192.168.50.1 - DNS server:
192.168.50.1
To view issued DHCP leases:
cat /var/lib/misc/dnsmasq.leases
user@gate:~ $ cat /var/lib/misc/dnsmasq.leases
1767242694 d8:e2:df:c1:3d:ab 192.168.50.63 DEV 02:d8:e2:df:c2:3d:ab
Client-side checks:
ping 8.8.8.8
nslookup google.com
curl ip.krasoff.com
The external IP should match the selected Exit Node.
Final Result
The result is a fully autonomous hardware VPN gateway that:
- Requires no VPN client on the target device.
- Integrates with an existing Tailscale infrastructure.
- Guarantees traffic exit through a specific country.
- Prevents DNS leaks and VPN bypass.
- Requires no port forwarding and works behind CGNAT.
- Can be easily relocated if needed.